We recently had a Land Rover come in with one of the most common complaints we hear during warm months, the AC wasn’t cooling. The owner said they’d already tried a gas top-up elsewhere, but it didn’t help. That was all we needed to hear.
Right away, we knew there was a deeper issue. If refrigerant disappears after a refill, there’s a leak somewhere. And if that leak’s been there a while, chances are more components have been stressed or damaged along the way.
First Step: Diagnosis, Find the Leak
We started by checking the system pressure. As expected, it wasn’t holding. So we did what we always do, ran a full vacuum and leak test. You can’t just start replacing parts without knowing exactly what’s going wrong.
What we found was a bit of a mess.
There were leaks in multiple places:
- Several worn-out O-rings across the system
- Leaks in both the front and rear evaporators
- Leak in the Condesner
- The AC compressor itself seemed weak under testing
At that point, we knew this wouldn’t be a quick fix. We flagged all the issues to the customer and laid out the plan. We strongly recommended replacing the compressor too, since it was underperforming and could become the next point of failure. The customer decided to hold off on that part for now. That meant we had to make absolutely sure every other part of the system was perfect to carry the load.
The Work: Rebuild, Replace, Reseal
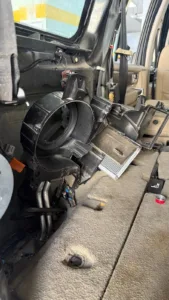
This job didn’t take time because it was technically complex, it took time because accessing the evaporators required significant effort. To replace the front evaporator, we had to strip down the entire dashboard. That alone took a couple of days, removing panels, trims, electronics, vents, everything.
The rear evaporator sits in the boot area, tucked behind panels and trims. It took more hours and even more care. In a Land Rover, interiors are tight and well-built, great for comfort, not so great when you need to get behind them. This gets even trickier in Gulf regions, where temperatures can hit 50+°C. Over time, plastics and vinyl used in dashboards and trims tend to become brittle and degrade due to constant heat and sun exposure, making disassembly a delicate, high-risk task.
Here’s everything we replaced:
- Every single O-ring in the system
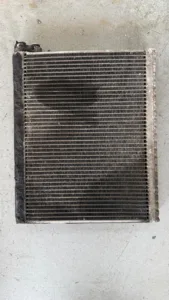
- The Condenser assembly
- Both the front and rear evaporators
- Cleaned and flushed the AC lines to remove old oil and contaminants
We cleaned the entire gas line thoroughly. Over time, broken seals and degraded refrigerant oil can leave behind debris or moisture. It can damage new parts if left behind, especially in high-pressure systems like these.

Reassembly, Vacuum, and Final Leak Check
Before reinstalling the dashboard and trims, we ran a quick pressure test after fitting the new evaporators to make sure there were no leaks in the system. Once everything checked out and the system held pressure, we moved ahead with the final dashboard installation.
Next, we filled it with Wurth R134a AC gas, a top-grade refrigerant made in Germany. We prefer it because it’s stable, efficient, and works well with European vehicles like the Land Rover.
We ran the system at idle, at load, and on test drives. The cooling was spot on: cold air flowing from every vent, including the rear zone. The compressor, though not perfect, managed to do its job without strain.

Time and Effort: 15 to 18 Hours Over Three Days
This job took us about three days, with 15 to 18 hours of hands-on work. Some of that was diagnostics. A lot of it was disassembly and reassembly, which on this vehicle is no small task. The rest was careful testing and making sure everything was done right.
There are no shortcuts in a job like this. If you rush it, you’re guaranteed to miss something, a small leak, a loose seal, a cracked pipe and that means the whole job has to be done again. We don’t work like that.
A Word to Land Rover Owners (and Everyone Else)
If your AC is acting up, don’t ignore it. Especially if the gas level drops right after a top-up. That’s a warning sign, not a fluke. Leaks don’t fix themselves, and running a low-pressure system for too long will eventually kill your compressor, clog the lines, and double your repair cost.
A few tips from our side:
- Don’t rely on “top-ups” as a fix. Always test for leaks.
- Replace weak compressors before they break completely.
- Use quality parts and refrigerant, cheap ones don’t last.
- Get repairs done by someone who’s willing to open up the system, not just mask the problem.
Why We Do It
This kind of job reminds us why we do what we do. It wasn’t the easiest. It wasn’t quick. But we took a non-functional AC system and brought it back to life. More importantly, we did it properly, without hacks or band-aid fixes.
The customer drove out with full cooling restored. Front and rear vents blowing cold. No leaks. No weird noises. Just clean, cold air like the vehicle had when it was brand new.
If you’re having AC issues, or even just suspect something’s off, bring it to us at Bumper to Bumper. We’ll get your comfort back, the right way.


